

This pendant was made for Ellie who brought the Opal back from Australia for me. I hope she likes the setting. It features not only the lovely Opal but reticulation and movable parts. Ellie loves things she can fiddle with so I’m hoping this will be perfect for her. The Opal is only about 10mm long by 8mm wide and is an off-centre rectangle. It has fabulous blue and red flashes in it.

First things first though. My bench is about as untidy as possible. I think a tidy-up is in order!


Thats better, at least I stand a chance of finding something if I put it down now.
I want to make a pendant with layers that can move over one another. The first stage is to make the bezel setting for the opal. As with many boulder opals which are sold by weight there is a lot of excess rock at the back. I hate doing this because I worry that the stone will break but I need to slim down the stone and make the back level. I do this by rubbing the back of the stone on coarse sandpaper. You can see the brown rock just sands off really easily.

I need to make the bezel for the stone now. I want a strip of silver deep enough to come just over the top of the stone that which I can then wrap round it. I then measured the thickness of the stone and added some extra before scoring the depth of the bezel onto 0.8mm sheet. I wanted fairly substantial sheet so that the bezel would give a good wide band of silver visible round the edge of the opal.


I then sat the opal on a bit of blu tac to stop it skittering off and wrapped the bezel around it.


I sawed off the excess and trued up the edges to make them flush and then soldered it in place. I painted the surface with flux and then sat the join on a pallion of hard solder. Heating it enabled the solder to run through the join creating a stable fixing.

Phew, it fits!

I had been far too generous with my ‘little bit extra’. The bezel was way too deep for the stone so I marked around the top of the stone, sawed off the excess and then filed it so it was close.


I found a scrap of sheet that the bezel would fit onto and then sanded it to clean it up before soldering.


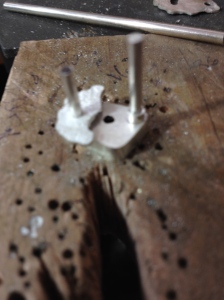
The bezel will form the top layer of the pendant and I need little legs that will slip through the other layers. I marked and drilled 2 holes to fit 2mm wire in the base of the bezel. I did this before cutting off the outside of the sheet as a larger piece of silver is easier to hold when you’re drilling that a small bit and I take exception to slicing my fingers with spinning silver!


I fitted some little bits of wire into the holes and soldered them in place.


Now I can trim off the excess using shears and files. I took the opportunity to file the top of the bezel at an angle so there wouldn’t be too much thickness to push over. It’s worth taking a lot of time and trouble with this stage as, once the stone is in place, you really don’t want to put a file near it.


I drilled another hole in the base, this is so I can remove the opal when I test fit it. That seems to fit ok. Put the Opal away safely now!!


On to the next layer. I want this layer to reflect light and look like silver rock rather than smooth and sleek. I’m going to try a technique that’s new to me – reticulation.
Reticulation isn’t difficult but it is laborious and a bit technical.
First, heat a sheet of sterling silver up to red, at this temperature the copper within the silver rises to the surface and is removed by immersing the silver in pickle (Dilute sulphuric acid). This depletes the top layer of copper and leaves a very thin layer of pure silver on the top. This is called depletion gilding.


Pickle pot heated by a tea light – old fashioned tech at work here!

After about six or so repeats of the heating and pickling you can start to see changes in the surface of the metal. Black spots appear during heating and very silvery patches appear after pickling.


This is where the magic starts. Eventually there is enough of a layer of fine silver on top of the sterling for the two layers to react to heat at a different rate. The top layer actually bubbles and starts to form lumps and craters. I can push the bubblesaround with the flame.


I left this to cool naturally and then pickled it again. I leave silver in the warm pickle for abut 15 minutes. I don’t know if it needs that long but it seems to work for me. As you can see I might have got a little enthusiastic about the heating and managed to melt a little bit on the edge. I think it looks lovely.


I put a little brass brush on the flex shaft and polished it up with that. I’m really pleased with the end result.


I want to put this as the first layer under the opal. I found a bit of the sheet that I liked the most and I sat the opal on top of it. I drew a shape around the opal following the natural lines and contours that the reticulation had provided me with. I used a piercing saw to cut the shape out. Nice effect. I like the way the edges follow the reticulation.


I want the reticulated sheet to move UNDER the opal so I need to fix one of the pins I already put on the back of the bezel and create an arc that the other one can move through. I started by drilling a hole for the top pin to go through and then shortened the other pin so I could scribe an arc for it to swing in. It took quite a lot of fiddling and felt tip pen marking to get the arc the shape I wanted. There was a handy hole in the bench peg that I could shove the longer pin into and wiggle the sheet under the shorter pin.


I sawed the arc out and the filed it so the lower pin would move from side to side. Unfortunately I hadn’t bargained on the fact that the movement of the bezel would reveal the cut out arc.

It looked really ugly so I cut another bit out of the reticulated shape that would extend beyond the cut out.


I soldered the blanking shape in place onto the bezel. I then put the larger reticulated sheet on the bezel and measured the distance between it and the bezel. I transferred the measurement to a bit of tubing. Making sure I didn’t go off line I very slowly sawed through the tubing until I had a little washer.


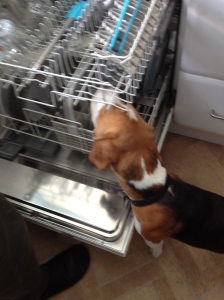
I might have got a little distracted at this stage by a certain pup becoming exceptionally interested in our dinner! He wanted to help tidy up afterwards as well.

Back to work! With the washer in place I can now fit the reticulated shape onto both pins. This is a side view so you can see the bezel. the blanking bit, the washer and the reticulated sheet.

On to the base plate. I want this one to be smooth and shiny as a contrast. I selected a sheet and drew out the shape I wanted. I cut it out with the saw and drilled two holes for the pins to fit through.


I then contoured the edges of the shape to make it more interesting but still maintain the smoothness. I used needle files for this and then smoothed the whole thing with sanding discs.

I have a tiny little round opal that I scavenged from an ugly old ring a few years ago. I want to set it on the base plate using the tube setting method. The opal is only about 3mm so I found some tube that was about 4mm diameter and cut down into the end of it using a stone setting burr. It’s easier to to cut into a long length of tube than cut the tube to length first and then try and drill into it.


I soldered the setting onto the base plate using extra easy solder. I really didn’t want to heat the plate up too much as it would then need a lot of cleaning up. I drilled through the setting so I could trial fit the opal and still push it out from the back. Looks lovely ! So I polished up the base plate and set the little opal properly.


OK. I have all the bits now. The bezel with the reticulated blank on it and the pins sticking out the back, the reticulated sheet, three washers, the back plate with the little Opal on it and the big Opal itself.

I want to join all these together with a cold connection as I won’t be able to get between the layers to polish it. All the parts were polished and ready to go. Slip the first washer onto the top pin.

Then the reticulated sheet followed by two more washers.


Finally the back plate. I drew round the pins with a sharpie so I could saw them off so that roughly 1mm stuck out behind the base plate to make into rivets.


Pins sawed off to the right length.

Now to complete the construction. I need to support the pins, upside down, so I can hammer the free ends, spreading them out over the back plate to make a secure rivet.
I put a short length of stainless steel rod into a vice.

I then had to get an extra pair of hands to hold the pendant in place while I hammered it. It was more than a little fiddly so I apologise for the lack of photos!

When you hammer onto the end of wire it spreads the end out so that it curves over. This has the effect of riveting the wire in place.


One final polish and then I put my makers mark on the back. Since this is a gift it doesn’t legally need to be hallmarked.


OK. On to setting the Opal and then the pendant itself is finished apart from the chain.
I will need to grip the pendant really hard to set the Opal as I need to push the edge of the bezel over the stone. I don’t want to hold it with hard tools like pliers in case they mark the surface so I will use Polymorph to hold it.
First soften the polymorph using hot water. Then squish the pendant into it so that when it cools and hardens it will grip it firmly.


Put the Opal in the setting and then using a rocking action with a pusher bend the edges of the bezel over the stone. I always seem to hold my breath at this point. It’s so easy to push too hard and chip the brittle Opal.

The use a burnisher to smooth off the top of the bezel and shine it up.

And there we are, finished.

Time to move onto the chain – oh and time to tidy the bench, it looks like a bomb’s hit it! I always seem to wind up with less and less space as I go on.

I want to hang the pendant on two chains slipped through the spaces between the layers. I bought some really nice finished cain and slipped it through to see what it would look like. Not bad, now I need to alter the ends of the chains so that they only have one fastening – not two.

Ok that was really clever NOT!! I melted the ends off the chains when I was trying to join the clasp to both ends. Grr….


This was fiddly beyond belief! but I finally got the two chains fixed at either end and running through the right gaps in the pendant. One underneath the Opal and one between the reticulated sheet and the back plate.

And there we are – one pendant with movable parts for my Ellie.


Thank you for reading – comments are always welcome.
