
All finished and ready to go.
This is an earring and necklace collection for a special person. She chose the stones a while ago but will have to wait for Christmas to get them.
Drusy’s are strange stones with a crystalline face and a flat back. They are normally treated with a mineral of some kind – in this case titanium which gives the lovely purple finish.
There are two ovals and one teardrop shape. The ovals are for earrings and the teardrop is for a matching pendant.


Mounting these is going to be a challenge. I’ve never set Drusy before and this will be a bit of an experiment. Unlike other cabochons there is no smooth edge to bend a bezel over. The surface is covered with tiny crystals. I could make a claw setting but I’m not sure that I will like the effect. I’m going to try and make a bezel setting but will have to shape the bezels to fit over the rough edges of the crystals. Nothing ventured, nothing gained, so let’s just do it.
First make the bezels. Cut the 0.3mm silver to length and wide enough to give me plenty to play with.

Then bend it round and join the ends together. It has to be a tight fit with no gaps. The best way to check this is to hold it against the light. I can see no light!

That’s fine – no gaps.
Then paint the whole thing with flux and sit it on a pallion (tiny snip) of solder. Aplly heat and when the solder flows into the joint, it’s done. Repeat with the one for the other oval.


They will both need pickling in sulphuric acid to remove copper oxide and shape them to fit. One was ok but the second one was far too big. You can see between the stone and the bezel. I needed to reduce the size and then it fitted fine.


Then file the base flat and check I can get the base out of my 0.3mm sheet – phew just enough!

Flux the base and put pallions of solder around the bezel to solder the two together. In the photo you can see the tiny chips of solder. As I heat it I will make sure I snuggle them right up to the bezel so that a clean line of solder runs all the way through.

On to making the bezel for the pendant. This is a much trickier shape but the same principles apply. I formed the bezel around the stone, marked it and then cut it.

 .
.
That will have to do for now – got a bit distracted this weekend.

Ok. Back to work. Returning to the earrings. I soldered the bezel to the base and then snipped the edge of the base off with shears. I could have sawn it but it was thin enough to shear and shearing is a lot faster.

I have a real problem with making the bezel fit over the stones. The top surface of the stone is so uneven and I want to retain the crystalline look. I just don’t think I can successfully push a bezel over. Look at the stone from the side and you will see what I mean.


After much tea and puzzling, I am going for a combined bezel and claw setting. I filed down the side of the bezel so it is slightly narrower that the stone. I polished it up a bit so that I wouldn’t need to do too much more one the claws are fitted.


After much inspecting I filed grooves in the bezel where there were dips in the crystals. I need to solder wire to the side of the bezel so I can push the end of the wire over the stone in the dips created by gaps in the crystals. The claws won’t be evenly spaced.

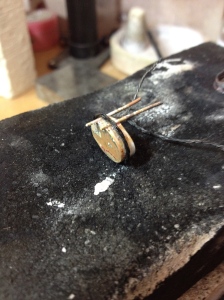
Making the bezel/claw assembly was tricky. I bent the wire into two ‘U’ shapes and held them in place using a soft soldering block that I could push the ends into. I decided to solder the ear-post in place at the same time to minimise heating. Theis picture shows the assembly ready for soldering.

I cut the ‘U’ bends off the assembly and then practice fitted the stone.


After filling and sanding the bottom of the claws to make them look nice I shaped the tops into little spikes and polished it up. I did take the dental floss out. Looking good!

On to the Necklace. Having formed the bezel I marked out where I wanted it to go on a base place. I then stamped my makers mark on the back (I forget to do this with the earring – Ooops!


Solder the bezel onto the base place and then cut the bezel down to size. This stone has clean edges to push the bezel over so I won’t need to make claws.


Good, the stone fits. Er…actually it fits too well, can’t get it out, tore the dental floss. Bother. Had to drill a hole in the back and push it out!

I wanted to make the pendant more interesting than just a simple bezel stetting so I twisted a length of 0.5mm wire to make a rope and then wound it round the bezel. I formed the top into a loop to make the bail for the necklace. This was then soldered in place and then pickled. If you look carefully you can see the strategically positioned hole in the back.


After soldering it I cut out a neat shape on the back to mask the hole I had to drill to get the stone out. I polished itt and then popped it in the ultrasonic cleaner to get the polish out of the nooks and crannies. You can see the cloud go black polish escaping into the soapy water.


That done it was time to put the stone in. Why do I always get so nervous at this stage? It looks good to me!

Back to the other earring. This stone is much more difficult than the first one. It has one side that is very smooth and one side that is crystalline. This is going to be a really bespoke setting!

I made the setting the same way as the first one but only put claws on the side that has the crystals. The bezel needed a really wavy edge.

Bit of a pig to solder but eventually holding it all together with binding wire worked.
After soldering I gave it a good clean under the tap with an electric toothbrush – not the one I use for my teeth I hasten to add.

Phew. It fits. Just need to cut the claws to length and push them over.


And there we are. One Drusy earring and necklace suite for a special person.

