

Boulder opal Earrings
I’m using a matched pair of dark Blue Boulder Opals from Lightning Ridge in Australia to make an earring set for Helen. I really like these stones, they are very dark and look to me as if I’m gazing into a deep pool of inky water. The stones have a curved top face and are very well polished. These are going to be post earrings so I’ll make a silver case for them and then put a post in the centre of the back.

The first thing to do is number the stones. They aren’t entirely identical and I need to keep track of which one goes in which setting.
I made the bezel for each one. A bezel is the band of metal that goes around each stone and is pushed slightly over the top of the stone to hold it in place. I want reasonably thick bezels as I feel that a definite ‘ring’ of silver around the stones will set them off more effectively than a slim one. This is a fiddly job as the bezel has to fit the edge of the stone exactly. Get them both lined up and then solder the join in place.


Once soldered the bottom of the bezel needs to be completely flat so it will sit flush on a base plate that will form the back of the earring. I do this by rubbing the bezel up a flat file – and slice my thumb open in the process – we now have the blood, let’s hope we don’t get the sweat and tears to go with it.

Once the base is flat, apply flux and place tiny chips (called pallions) of solder snuggled up to the join. Flux is a paste made of borax which encourages the solder to flow.

As you heat it the pillions jiggle around so they need nudging back into place. Once the solder has flowed you can see it as a shiny line between the bezel and the back plate.

All done, now to check the stone fits. Since I want a tight fit I won’t be able to just shake the stones out once they’re in and I will need to be able to get the stone OUT of the setting to be able to finish off the earrings. Note the cunning use here of dental floss! Lay the floss over the mount and then push the stone in trapping the ross under it. The ends of the floss allow me to pull the stones out. This trick, it must be admitted, is the result of having once had to completely destroy a partially made setting to get the stone out.


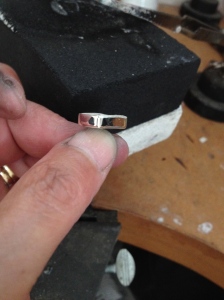
That IS a tight fit. The bezel is far too deep for the stone. The stone isn’t flat on the top, its curved so I will have to shape the top if the bezel to fit. With the stone in place run a felt tip pen around the inside to leave a line marking the top of the stone. This gives me a guide to file to. Keep fitting the stone, checking, filing – fitting, checking filing. It’s a slow process but can’t be skimped.


I think we’re about there – I only want about 0.3mm above the stone.

When its very nearly there I cut a tiny slit in each corner. This setting has square corners and if I don’t remove some of the silver it will pucker and crease when I push it over the stone at the corners. The width of a saw blade is usually just enough.

One down – on to number 2. Repeat the marking on the inside and and cut off the excess


One the fit is perfect, cut some 1mm wire and solder to the centre of the backs to create the posts.

This is the time to polish up the mounts. Everything must be finished before the stones are fitted.

I wanted nice thick bezels for these earrings to give a broad rim of silver to the stones but at the moment they are too thick to push over the stones. I filed the top edge off at a sharp angle and sanded and polished the edge. Opals are fragile and brittle and chip really easily so I don’t want to have to apply too much pressure when I push the lip of the bezel over A chipped opal is not an option!
Holding the earring firmly I used a pusher to bend the top of the bezel over the stone. This is physically hard to do and needs to be done slowly and steadily. Once the edges are all pushed over, burnish them with a polished burnisher and check for flaws.

Once they are all pushed over I cut the posts to 10mm and cut a notch all the way round for the ‘push-fit’ backs to snap onto.


There, all done and ready for the backs. Normally I would use ready made backs but I decided to make my own this time. A bit more special.
MAKING ‘PUSH-FIT’ or ‘SCROLL’ earring backs.
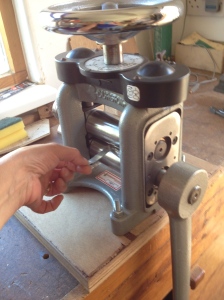
I need silver sheet 0.355mm thick. I didn’t have enough in stock so used the Rolling Mill to reduce the thickness. I started at 0.8mm and kept rolling it until I got it close enough.

Rolling down sheet is really hard work and it took about 23 passes through the rollers to get it to 3.6mm


I carefully marked out circles 6mm diameter with ‘wings’ that extended 7.5mm either side. I marked the centre of the circles with a centre punch and then drilled 0.9mm holes in the centre before I cut them out. I checked that the wire I use for the posts will fit through the holes.


Then, very carefully, saw out the shapes and use a doming punch to dent the centre of the circular part. This gives a good shape. Using round nose pliers I curled the wings around until they nearly met at the back.


A final polish of the backs which includes retrieving the one that ‘pinged’ off and landed in the far corner of the room!
ALL DONE AND READY FOR HELEN.

